
How to Turn a Screen Recording into Step-by-Step Documentation (Without Typing a Word)
A practical, hands-on walkthrough: from hitting record to a polished, exportable step-by-step guide - without touching a keyboard for the writing part.

Every team has that one process nobody has written down. The one everyone knows how to do, sort of, but that gets explained fresh to each new hire in a fifteen-minute Zoom call. The one where “we really should document that” sits on a to-do list for months.
The reason isn’t laziness. The reason is that writing process documentation the traditional way is genuinely painful - a mix of rewatching, typing, screenshotting, cropping, formatting, and second-guessing that turns a ten-minute workflow into a half-day project.
This guide shows you the alternative: how to turn a single screen recording into a polished, step-by-step guide - without typing a word of the writing yourself. You’ll see the full process end to end, exactly what to do at each stage, and the mistakes to avoid so the AI output comes out clean the first time.
If you can record your screen, you can produce documentation your team will actually use! Here is exactly how…
What You’ll Need
You don’t need a specialist setup. If you have the following, you are ready:
- A screen recording tool. Loom, OBS, QuickTime, the built-in Windows recorder, Zoom - anything that produces an MP4, MOV, or AVI works. video2docs also has a built-in recorder you can use in the browser if you’d rather skip installing anything.
- A quiet ten minutes. Enough time to run through the workflow once, cleanly, without interruptions.
- A video2docs account. Free plan includes credits so you can produce your first guide without paying anything.
That’s it! No writing skills required, no formatting knowledge needed, no separate screenshot tool.
Step 1 - Plan the Recording Before You Hit Record
The biggest lever for quality is what you do in the sixty seconds before you start recording. A little planning here saves you from re-recording later.
Ask yourself three questions:
What is the single outcome this guide should teach? Good guides answer one specific question (“how to invite a teammate”, “how to export a report as PDF”, “how to reset a user’s password”). If you catch yourself planning multiple outcomes, split them into separate recordings - one process per video always produces cleaner output than a five-in-one marathon.
Where does the workflow start and end? Decide the exact first click and the exact last click. Everything before and after that is noise. If your process starts on a specific dashboard, open that dashboard before you start recording - nobody needs to watch you navigate there from your inbox.
What sample data will you use? Real-looking but non-sensitive test data makes the guide feel authentic without exposing customer information. If you’re documenting a settings flow, use placeholder names rather than a real client names. If you’re demonstrating a form, pre-fill sensible test values.
Sixty seconds of planning here removes ninety percent of the “ugh, I ruined everything and got confused, let me start over” moments later.
Step 2 - Record Cleanly (The Five Habits That Matter)
Recording quality determines output quality. Follow these five habits and the AI has everything it needs.
1. Close everything you don’t need. Extra tabs, Slack notifications, calendar popups - they clutter the recording and confuse the step detection. A minimal desktop makes a minimal, focused guide.
2. Work at a natural pace. The single most common mistake is rushing. When you click through steps quickly, transitions blur and the AI can miss actions. Move at the speed you’d use if you were physically showing a colleague. If anything, err on the side of slightly slower than natural.
3. Pause briefly after each significant action. Half a second on the confirmation screen. A full second on the “success” toast. These micro-pauses give the AI clean transitions to detect and produce sharper step boundaries in the output.
4. Narrate the intent, not the mechanics. You don’t need to say “now I move my mouse to the button in the top right corner and click it”. You should say “now I’ll open Account Settings”. The AI already knows what you clicked from the visuals; your voice adds the why, which shows up as richer step descriptions.
5. Don’t stop mid-process to fix things. If you fat-finger a field, correct it and keep going. Small correction moments are fine - they even help the AI understand common mistakes. Stopping and restarting a recording partway through fragments the story and forces you to start over.
Follow these five and your recording is doing the work of a scriptwriter, a screenshotter, and a technical writer all at once.
Step 3 - Upload and Let the AI Process It
This is the easy part. Open video2docs, upload the recording (drag-and-drop or use the in-browser recorder), and wait.
You’ll see progress as the AI works through the video: transcription first, then step extraction, then visual capture at the correct moments, then description generation. A typical five-minute recording is fully processed in under two minutes (depends on the chosen LLM model and its current load).
You don’t need to babysit this stage - go respond to Slack, grab a coffee, run a meeting. The Projects page refreshes status automatically every 5 seconds.
Step 4 - Review the Output (What to Look For)
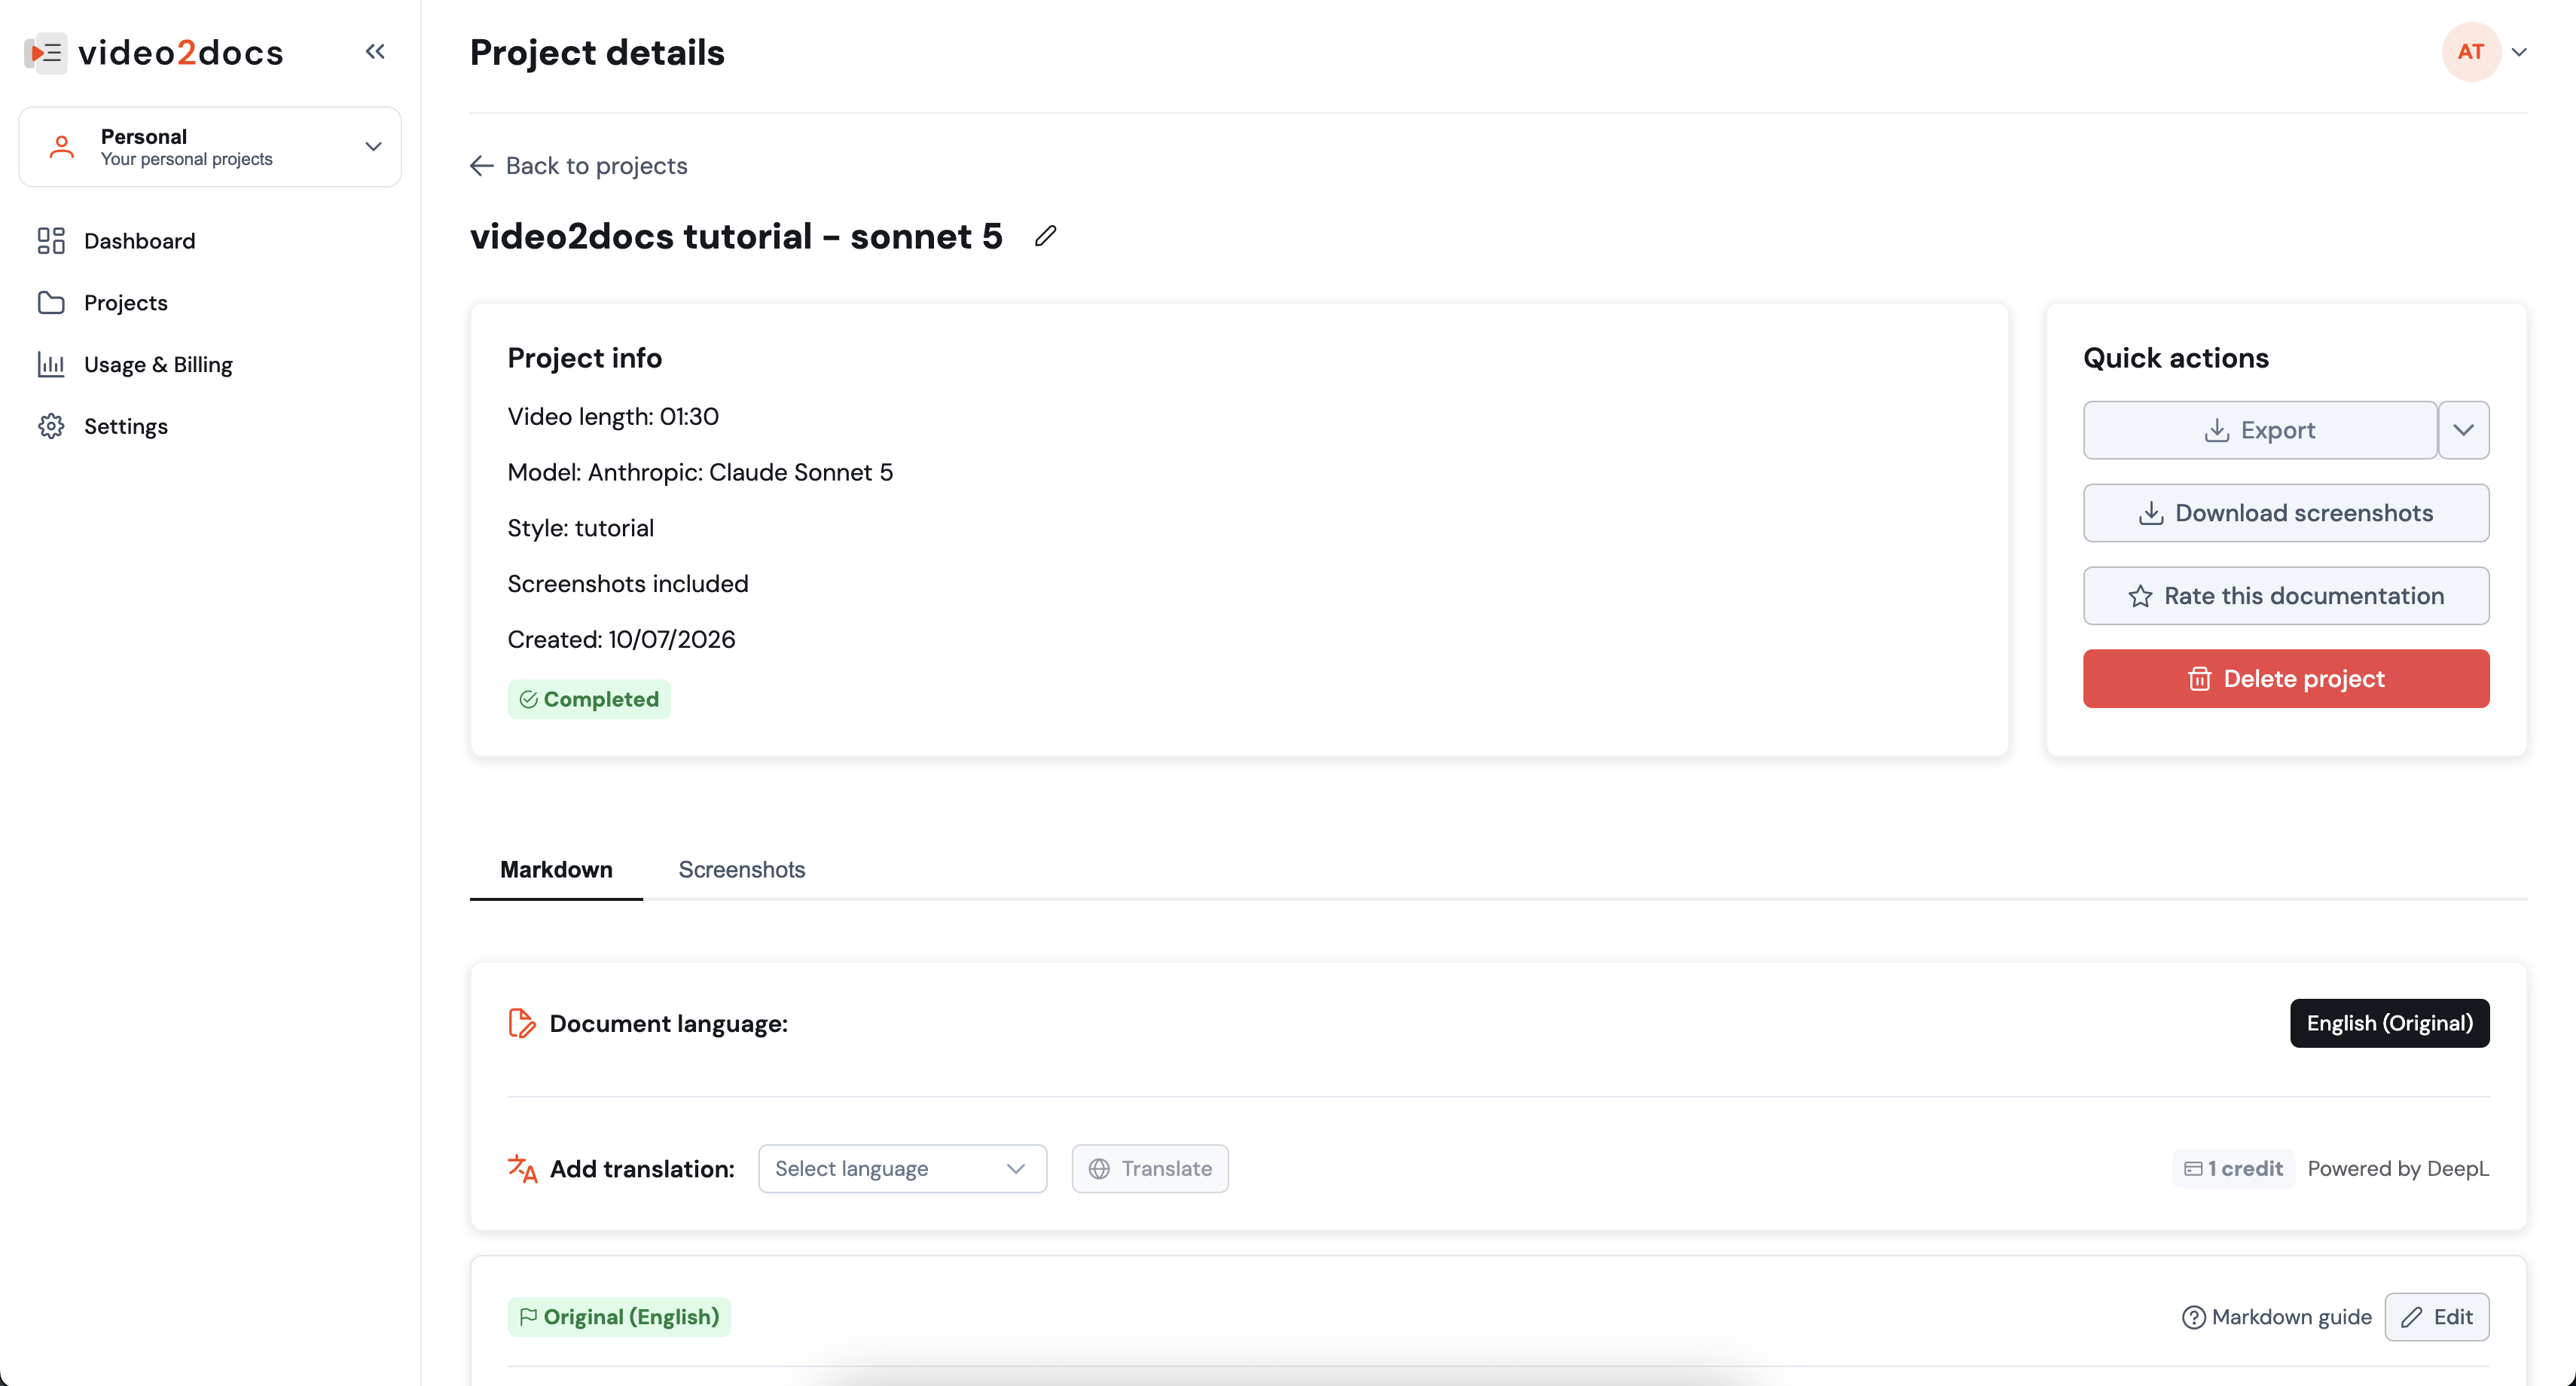
When processing finishes, you’ll see a structured step-by-step guide with a title, numbered steps, descriptions, and the correct visual moment captured from your recording embedded next to each step.
Read through it once, from top to bottom, and check these things:
Are the steps in the right order? They almost always are, but a quick sanity check catches the rare edge case. If two adjacent actions happened very close together, the AI may occasionally group them differently than you would.
Do the step titles make sense as standalone summaries? A reader skimming the guide should be able to understand each step from the title alone. If a title is too vague (“Click button”), sharpen it (“Click Save changes”). If a title is too long, tighten it.
Are the descriptions accurate? The AI describes what it observed. If a step description says something factually wrong (usually because the recording was ambiguous), correct it in one sentence.
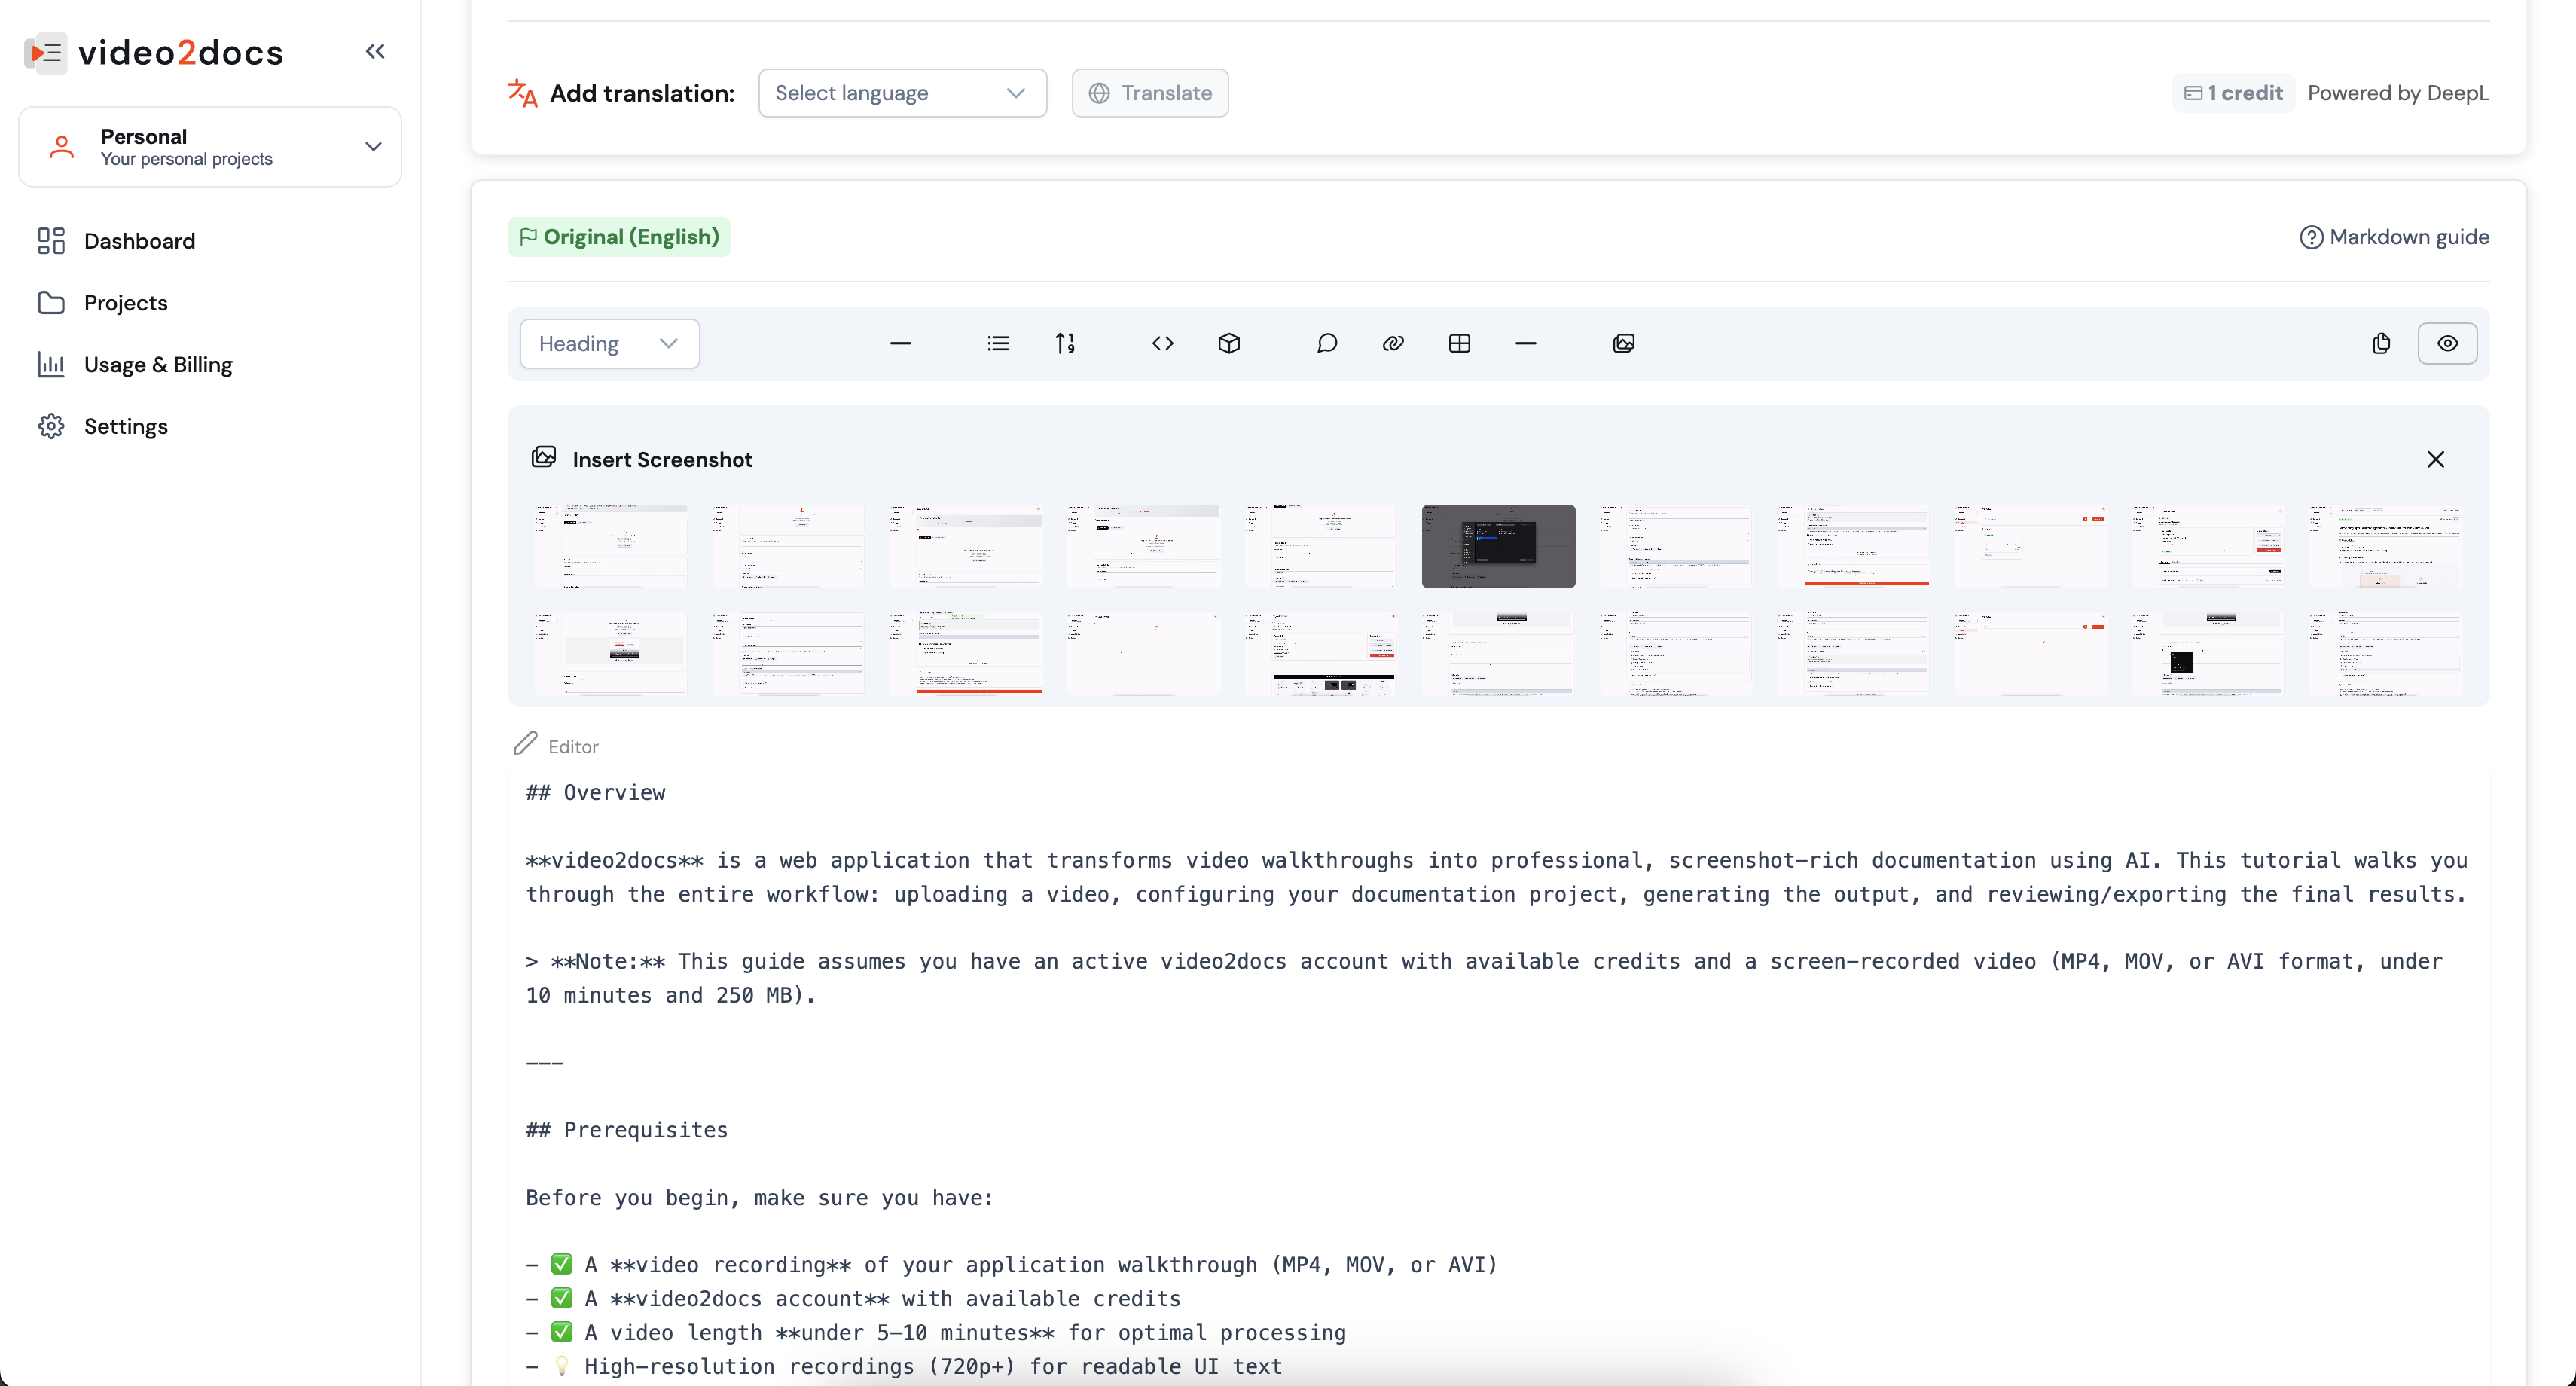
Are screenshots where they should be? Check whether appropriate screenshot was used for the step - you can replace it with any other screenshot captured by the video2docs. Maybe the screenshot is not even needed - you can remove it then!
Most guides need five to fifteen minutes of light editing at this stage - no more. You are doing quality control, not rewriting. :)
Step 5 - Polish (Optional but Recommended)
Once the core content is correct, a few small polishes turn a good guide into a great one.
Add a one-sentence intro at the top. Something like: “This guide walks through how to invite a new teammate to your workspace. It takes about two minutes and requires admin permissions.” Reader knows immediately whether the guide applies to them.
Add a “before you begin” prerequisites block if relevant. Any account role, feature flag, or setting the reader needs before starting. This saves the “I got stuck on step three” support ticket.
Add a closing “what next” line. Point the reader at the next logical action or a related guide. Keeps them moving forward instead of hunting for what to do after.
Tighten step titles into imperative verbs. “Click Settings” beats “Now, click on Settings”. “Enter your email” beats “You will now enter your email”. Short and direct reads faster.
Total time for polishing: five minutes for most guides.
Step 6 - Export and Share
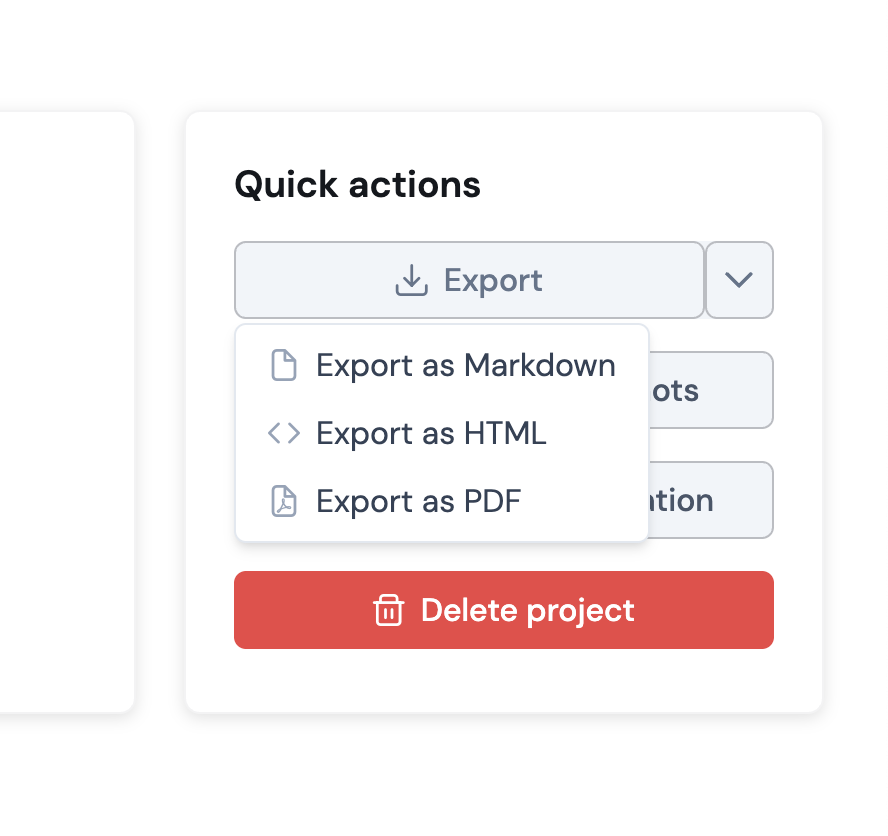
Once you’re happy, export the guide in the format that fits your team’s tools:
- Markdown - paste directly into Notion, Confluence, GitHub, Linear, Docusaurus or any Markdown-based wiki. Formatting is preserved, images are inlined.
- HTML - embed in your help centre, product tour, or intranet page. Works with any CMS.
- PDF - send as an onboarding attachment, print for a training session, share with a client.
If your knowledge base uses Notion or Confluence, the Markdown export is the fastest path - it takes about ten seconds from “export” to “published in the team wiki”.
Common Mistakes and How to Avoid Them
Five patterns cause ninety percent of the “the AI got it wrong” complaints. Avoid these and your first guide comes out clean.
Recording multiple workflows in one video. The AI treats one recording as one guide. If you document “how to invite a teammate” and “how to change your password” in the same recording, you get one confused guide instead of two clear ones. Rule of thumb: one recording, one outcome.
Recording with notifications enabled. A Slack popup mid-recording ends up as a step in your guide. Turn on Do Not Disturb before you start.
Rushing. Every rushed recording produces a guide with missing or merged steps. Slow down. The extra thirty seconds you spend recording saves you five minutes of editing.
Skipping the review step. The AI is accurate, but not infallible. Two minutes of proofreading before you share the guide catches the small stuff - a mislabelled button, an ambiguous description - that would otherwise land in front of a reader.
Using screenshots outside the recording. The AI extracts visuals from the recording itself, at exactly the right moment. If you try to paste in additional screenshots afterwards, they’ll feel disjointed. If a step needs a specific visual, re-record it - don’t patch it in.
A Realistic Example: Onboarding a New Teammate
Let’s make this concrete. Say you need to document “How to invite a new teammate to your workspace” - a classic onboarding guide.
Traditional approach: open a blank Notion page, write “Step 1: Log in”, take a screenshot of the login screen, crop it, paste it in, resize it, add a caption. Write “Step 2: Click on Settings”, screenshot, crop, paste, resize, caption. Repeat for each of the eight steps. Format everything consistently. Total time: around two hours for a first draft, plus another thirty minutes when someone points out you forgot the two-factor auth step.
Screen recording approach: record yourself doing the invite flow once, at a natural pace, with brief narration. Upload. Wait ninety seconds. Review the eight-step guide the AI produced. Sharpen two titles, fix one description, add a one-sentence intro. Export to Markdown. Paste into your Notion knowledge base. Total time: roughly fifteen minutes from hitting record to published guide.
Same outcome, one-eighth the effort.
When You Should Not Use This Approach
This method is excellent for procedural documentation - workflows, SOPs, product walkthroughs, IT runbooks, support answers. It is less suited for a few things:
- Conceptual explainers. Articles that explain why something works, or that compare abstract concepts, need writing from scratch. AI turning a recording into a guide can’t invent conceptual framing that isn’t in the recording.
- API or code reference docs. Structured technical reference (endpoints, parameter tables, return types) belongs in a proper docs generator, not a video-derived guide. You can try it, but we can’t promise the best possible outcome (for now).
- Highly branded marketing content. If every sentence needs to hit a specific tone of voice, you’ll spend as much time editing as writing.
For everything else - the vast majority of internal and product documentation most teams need - recording is faster, more accurate, and easier to maintain than writing from scratch.
The Payoff
Once your team adopts this workflow, three things change quickly.
Documentation stops being a person’s job. Anyone who can perform a workflow can now document it. The knowledge that used to live in one senior teammate’s head can be captured by any team member in fifteen minutes.
Guides stay current. When a process changes, you re-record the updated flow, regenerate the guide, and replace the old version. Documentation stops going stale, because updating it costs so little.
New hires ramp up faster. They stop asking the same questions in Slack or Teams, because the answers are actually written down, actually accurate, and actually easy to find.
Documentation was never supposed to be the most painful part of your team’s week. Now it doesn’t have to be.
Frequently Asked Questions
Do I need to narrate my recording?
No. Narration is optional and only improves richness of the descriptions. A silent recording still produces a fully usable step-by-step guide from the visuals alone.
What’s the longest recording video2docs can process?
Recordings up to 10 minutes are supported. That said, guides work best when they cover a single workflow - consider splitting your video into shorter recordings for cleaner output.
Can I edit the guide after it’s generated?
Yes. Every step title, description, and image is editable directly in the video2docs editor before you export. You can also reorder or delete steps.
What if the AI misses a step?
If it happens you can add the missing step manually in the editor, drop in a screenshot from the source recording, and continue. In practice, the more common issue is over-splitting (two steps that should be one) - which is fixed by merging in the editor.
Can my team collaborate on guides?
Yes. The team plan supports shared workspaces where multiple people can create, edit, and manage guides together. Perfect for turning documentation from a one-person bottleneck into a team-wide capability.
Which format should I export to?
Use Markdown if your knowledge base is Notion, Confluence, GitHub, or any wiki that accepts Markdown. Use HTML for embedding in a website or help centre. Use PDF for standalone sharing, onboarding attachments, or printed training materials.